
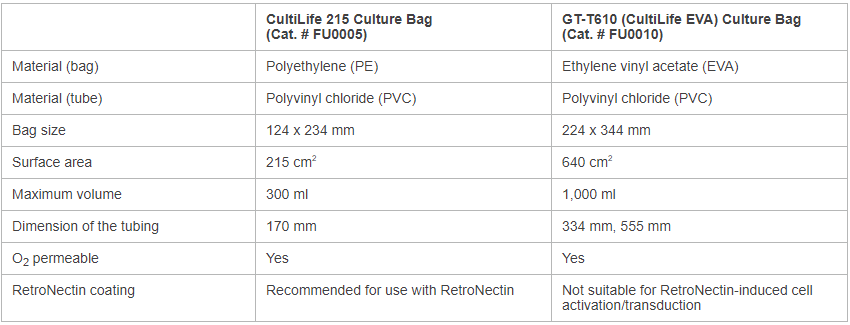
CultiLife 215 Culture Bags (Cat. No. FU0005) provide a closed, sterile system for growing cells that reduces the risk of both culture contamination and user exposure to culture materials. These bags, which offer improved cell proliferation over conventional growth in flasks, are composed of gas-permeable polyethylene and can be coated with RetroNectin reagent (Cat. Nos. T100A, T100B & T202) for high-efficiency retroviral or lentiviral transduction of hematopoietic cells. After transduction, the cells can then be expanded into the larger GT-T610 (CultiLife Eva) bag (Cat. # FU0010), which is composed of ethylene vinyl acetate (EVA), a flexible material that is also gas permeable. The bags are transparent, allowing cells to be viewed through a microscope while inside the closed system. The bags are available in multiple sizes, and their smaller profiles take up less incubator space than flasks. The table below compares the features of these two types of culture bags.
Materials required
- 10 CultiLife 215 Culture Bags
- Sterile connecting device (e.g., Terumo TSCD II Sterile Tubing Welder): for aseptically connecting tubes
- Transfusion stand: for adding culture medium and transferring contents into multiple bags
- Hemostat: for clamping tubes
- GT-T610 (CultiLife Eva) Culture Bags (also referred to as CultiLife 610 bags)
Setup protocol
Schematic of port setup
There are three ports on a CultiLife cell culture bag (Figure 1).
- Syringe port: for adding media with a syringe and large-gauge needle.
- Female connector port: for use with either a syringe or a tube with a male connector.
- Male connector port: for use with a tube with a female connector.
Each port should be prepared and connected as described in the protocol below.

Figure 1. Identifying the connection ports on a CultiLife 215 Culture Bag.
Protocol: Setting up a CultiLife 215 Culture Bag
- Using the Syringe port (Figure 1).
- Sterilize the Syringe port using 70% ethanol.
- Inject or sample small amounts of medium through the port using a large (≥10 ml) syringe (Figure 2). For easier media transfer, use a large gauge needle (at least 20 gauge).

Figure 2. Injecting medium through the syringe port.
- Using the Male or Female connector port
- Connecting bags directly (Figure 3).
- A CultiLife cell culture bag containing cells in culture medium can be directly connected to a fresh bag using a tube line attached to the appropriate port.
- Tubes can be connected using a sterile connecting device to ensure maintenance of aseptic conditions.
- Media can be transferred in this manner using a scale to measure the amount being transferred.

Figure 3. Using a scale to measure the amount of media transferred between CultiLife bags that are directly connected.
- Infusing medium through a funnel (Figure 4).
NOTE: This technique must be performed in a biosafety cabinet to ensure that sterility is maintained.
- A large-volume (≥50 ml) syringe can act as a funnel for media by connecting it to a tube line, followed by connection to the appropriate port.
- Media can then be added through the top of the syringe using normal cell culture pipetting equipment.
- After infusion, the connection must be sealed using a tube sealer.

Figure 4. Infusing medium through a funnel into a CultiLife bag.
- Connecting bags directly (Figure 3).
Multi-bag protocol
Protocol: Passaging cells using multiple CultiLife cell culture bags
This protocol describes how to passage cells from a CultiLife 215 Culture Bag to five CultiLife 610 Bags.
- Using a Y tube connector, connect a CultiLife 215 bag (containing your ready-to-be-passaged cells in medium), an empty CultiLife 610 bag, and a bag containing ~3 L of fresh media using the male or female connector ports. Make sure that the CultiLife 215 bag and the bag containing the fresh media are clamped with hemostats before connecting the bags.
- Transfer all of the cell suspension from the CultiLife 215 bag to the CultiLife 610 bag.
- Clamp a hemostat on the line connecting to the CultiLife 610 bag.
- Unclamp the line connecting to the fresh media bag and transfer 100–200 ml of fresh medium to the CultiLife 215 bag to rinse.
- Reclamp the line connecting to the fresh media bag.
- Unclamp the line connecting to the CultiLife 610 bag and transfer the rinsed medium from the CultiLife 215 bag to the CultiLife 610 bag.
- Reclamp the line connecting to the CultiLife 215 bag.
- Add fresh medium to the CultiLife 610 bag to a final volume of 1 L.
- Remove the CultiLife 215 bag and connect a new CultiLife 610 bag in its place.
NOTE: The disconnected CultiLife 215 bag can be inspected under a microscope to ensure that the majority of cells have been transferred. If not, repeat Steps 5–8.
- Combine 200 ml of cell suspension from the original CultiLife 610 bag with 300 ml of fresh media (for a final volume of 500 ml) in the new CultiLife 610 bag, as described in Steps a–f below.
- Reclamp the line connecting to the fresh media bag.
- Unclamp the line connecting to the new CultiLife 610 bag and transfer 200 ml of cell suspension to this bag from the original CultiLife 610 bag.
- Reclamp the line connecting to the original CultiLife 610 bag.
- Unclamp the line connecting to the fresh media bag and transfer 300 ml of fresh media to the 200 ml of cell suspension in the new CultiLife 610 bag.
- Reclamp the line connecting to the fresh media bag.
- Disconnect and seal the newly filled CultiLife 610 bag.
- Connect a new CultiLife 610 bag and repeat Step 10.
- Repeat Step 11 two more times.
- Add 300 ml of fresh media to the original CultiLife 610 bag from Step 2 (for a final volume of 500 ml).
- Disconnect and seal the final bag from Step 12. You should now have five CultiLife 610 bags, each containing 500 ml of cells in fresh media.
- Lay the bags flat in an incubator (Figure 5).
NOTE: Do not stack the bags on top of one another, since this will interfere with gas exchange.

Figure 5. Laying a CultiLife bag flat in an incubator.